
Plex Setup on CentOS Container (Proxmox)
... & pulling files from an external SSD &/or an internal HDD. Yep, this was interesting.


< Note - this page is eternally updating as I play around >
So... why did I write this?
My primary objective was to setup a home lab, which could do the following things:
run LXCs of various linux distros (Kali via external install, and CentOS via Proxmox template) [done]
run a Plex Media server, accessing both external SSD and internal HDD data [done]
Setup a VPN for use in the server [done]
Setup VPNs for containers [yet to do]
Automatically pull files from various torrents safely and securely with Deluge (?), Sonarr, Radarr, and Prowlarr [yet to do]
Run my previously self-hosted Minecraft server [yet to do]
act as a NAS to store and backup family photos [for the future, if I upgrade hardware]
I know that my use case is incredibly specific, but after scouring the web for guides on the various problems I had along the way, I was exhausted enough to pull together a guide of how I accomplished each of the above.
This guide will focus on setting up a Plex Media server in a Proxmox container, which can access data from both an external SSD and an internal HDD.
Prerequisites:
- Installing Proxmox on a server
Setting up a container
Download a template for the distribution of Linux you want to use.
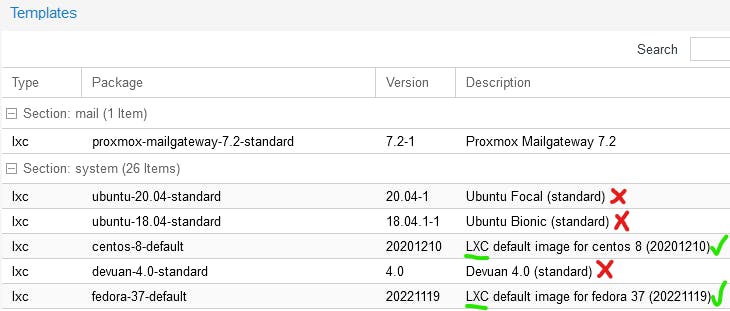
Simple? Should be. Pick your desired flavour of Linux and it should be available via accessing your local volume [local (juniproxmox) for me] and selecting CT Templates > Templates. However, make sure what you're selecting is actually a LXC, and not another version of Ubuntu/Debian (otherwise it will run like a VM inside of a container. And yes, that means it's s l o w). The difference is somewhat explored in the folllowing 'shallow dive' of sorts, and practically illustrated within Proxmox in Figure 2.
Testing the waters #1: LXC vs VMs.
From what I understand, LXCs are essentially lightweight VMs, which share the kernel (lowest-level software interfacing with computer hardware) with the host OS. In my case, Proxmox (based on Debian Linux) will share its kernel with an installed LXC (in this case, CentOS 9 Stream), allowing the LXC to run significantly faster than a VM by having access to the same kernel. However, I am unsure if you can run a LXC of Debian/Ubuntu on top of existing Debian/Ubuntu infrastructure, as I haven't been able to easily find LXC images for these online. However, I am most likely very much misunderstanding the nature of LXCs in general and am missing something obvious, so if anyone knows, please feel free to enlighten me in the comments ~
Figure 1: Finding CT Templates
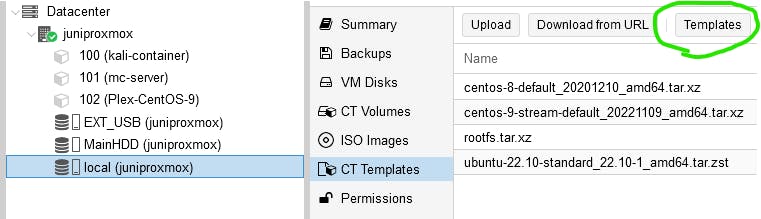
Figure 2: LXC Images vs Standard Image
After the CT template has been downloaded, installing is fairly straightforward. I followed the following video to get up to speed on what was recommended for a container install.
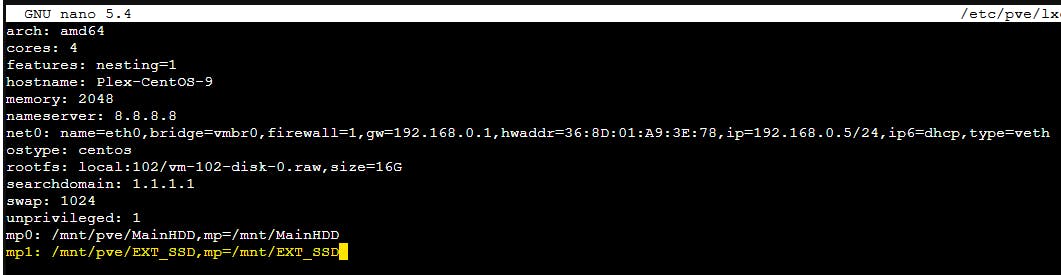
Here are the specs for my installation of CentOS 9 Stream, running a Plex Server which would have 2-3 users MAX (these are only testing values, take them with a grain of salt!):


Once the container has been setup and you can access the console (visuals included in above video, it's pretty straightforward), login using root (and preferably setup a lower privilege user if you're using the system for important things) and your container is ready to use!.
Installing Plex Media Server:
to be written ~
Passing USB/External Devices to LXC:
Now, for my use case, I wanted to use an external SSD containing media files as a sort of 'attached storage device' and have my Plex media server access and make the files streamable. However, doing so is a little complicated. It's covered rather well in Virtualize Everything's series of videos, but it can be confusing as there are quite a few ways of doing it, depending on one's use case.
My use case: Pass an External Device to a LXC WITHOUT ERASING DATA FROM IT, to transfer/access files on the External Device.
Based on the following video: Add USB storage to Proxmox (CLI)
Note: The term 'SSD' can be used interchangeably with 'External HDD/USB' --> this should work for all removable storage solutions.
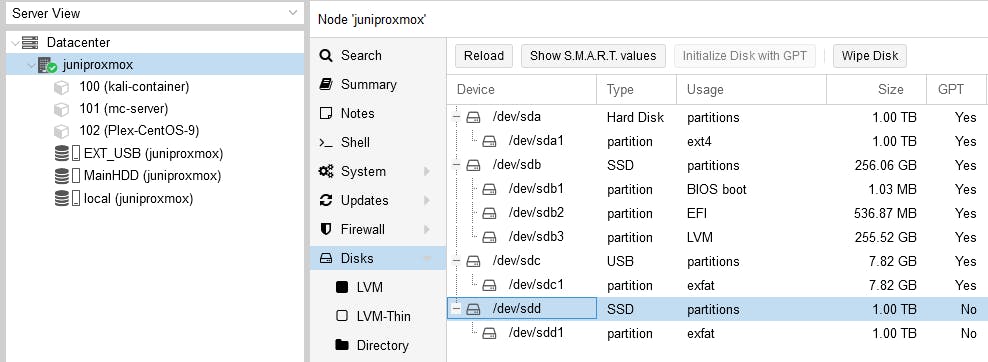
Plug in your USB to the server (in my case, my brother's old laptop). Nagivate to
'your home node' (juniproxmox)>disks. Here is a display of all of the functioning devices connected to your machine. My laptop has an internal HDD (listed assda), and an internal SSD (used as the boot drive,sdb). I also have a USB plugged in to the device, occupyingsdc.Thus, my SSD is
sdd, which checks out given it's been identified asSSDwith1.00TBof storage. It is best practice to have the drive using GPT, although I will be attempting to use one still using MBR, as it has worked before for me.
Testing the Waters #2: GPT vs. MBR
Formatting drive to use GPT - GUID Partitioning Table.
On your main node, open the shell and use
fdisk -lto list all available disks on the system in the CLI.After the text has been printed, look near the bottom for your chosen device, in my case
sdd. It's product name and actual usable size (smaller than but close to its advertised size) should be listed too. Take note of the device's identifier, which includes its location on the system. For me, it's listed under 'Device' at the bottom, as/dev/sdd1.
Now we know the path to the device, we need to make a folder on our home system for it to be accessed from. I think of this as creating its new address - the SSD has gone from floating around in the ether, homeless, and we're now making a directory on our system for it to call home. I poked around a bit using the
cd(cd = change directory- essentially how you traverse your Linux system in the CLI) andls(ls = list contents in current directory) commands, before deciding to make a new directory in/mnt/pve/, calledEXT_SSD. I suggest navigating to where you'd like the directory to be and then making it, as not all system's file structures are the same.Once I found the desired folder, create the directory using:
mkdir YOUR_DIRECTORY_NAME_HERE

Now, we need to mount the device so that the system can access its contents. This command takes the following form:
mount [physical device identifier] [new folder 'home']This is essentially telling the system to point my SSD (which has the identifier
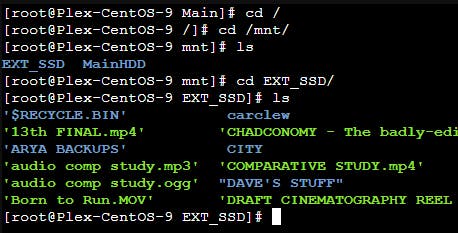
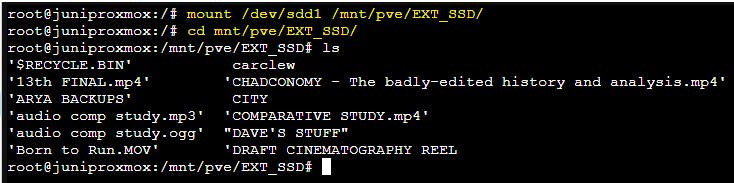
/dev/sdd1, as we identified in step 1) to live in the directory/mnt/pve/EXT_SSD/so its contents can be accessed by my home user.To test if it worked, I navigated to its new home with
cd mnt/pve/EXT_SSD/and then listed its contents and... success! I can now access my files on an external SSD within Linux.
Important Note: Every time my system reboots, the device needs to be manually re-mounted (aka repeating step 3) in order to access the files on the SSD.
To avoid having to do this, I modified the crontabs file (specifies tasks to be run ahead of time/periodically) using
sudo crontabs -e. I added@rebootto specify the task to run upon reboot, addedsudoat the start just to ensure it runs even if logging in with a lower privilege user, and ended it with&to tell the system to keep going & setting up after running this command.
I learnt this here.